🌈 Graphics
Drawing
-
screen.fill(color)¶ Fills the screen with the specified
color.The color option can be specified using a name (e.g. ‘white’, ‘black’), or an RGB triple.
Example: fill the screen with white¶screen.fill(color='white')
Example: fill the screen with red¶screen.fill(color=(255, 0, 0))
-
screen.text(string…, xy=…, color=…, align=…, font=…, font_size=…, max_width=…, max_lines=…, max_height=…)¶ Draws text
string.xyis the position that the text will be drawn.The align option is one of:
topleft, left, bottomleft, top, center, bottom, topright, right, bottomrightIf a custom font is used, it must be included in the tingapp bundle.
Example: Write ‘Hello world’ in black on the screen¶screen.text('Hello world!', color='black')
Example: changing the alignment¶screen.text('Hello world!', xy=(20,20), color='black', align='topleft')
Example: Using a custom font¶screen.text('Hello world!', color='black', font='Helvetica.ttf')
Example: Changing the text size¶screen.text('Hello world!', color='black', font_size=50)
Example: Confining text to a single line¶screen.text('Lorem ipsum dolor sit amet, consectetur adipiscing elit!', color='black', max_lines=1)
Example: Confining text to two lines¶screen.text('Lorem ipsum dolor sit amet, consectetur adipiscing elit!', color='black', max_width=300, max_lines=2)
-
screen.rectangle(xy=…, size=…, color=…, align=…)¶ Draws a rectangle at position xy, with the specified size and color.
Align is one of
topleft, left, bottomleft, top, center, bottom, topright, right, bottomright,Example: Drawing a red square¶screen.rectangle(xy=(25,25), size=(100,100), color=(255,0,0))
Example: Drawing centered¶screen.rectangle(xy=(160,120), size=(100,100), color=(255,0,0), align='center')
-
screen.image(filename…, xy=…, scale=…, align=…, max_width=…, max_height=…, raise_error=True)¶ Draws an image with name filename at position xy. If filename is a URL (e.g. http://example.com/cats.png) then it will attempt to download this and display it.
Images can be animated GIFs. Make sure to draw them in a loop() function to see them animate.
Scale is a number that changes the size of the image e.g. scale=2 makes the image bigger, scale=0.5 makes the image smaller. There are also special values ‘fit’ and ‘fill’, which will fit or fill the image according to
max_widthandmax_height.Align is one of
topleft, left, bottomleft, top, center, bottom, topright, right, bottomrightIf raise_error is True then any errors encountered while opening or retrieving the image will cause an exception. If it is False, then if there is an error a “file not found” icon will be displayed instead
Example: Drawing an Image¶screen.image('tingbot.png', xy=(25,25))
Example: Drawing an Image from a URL¶screen.image('http://i.imgur.com/xbT92Gm.png')
-
screen.line(start_xy=…, end_xy=…, color=…, width=…)¶ Draws a line between
start_xyandend_xy.
Screen
The screen supports all the methods above, and some extras below.
-
screen.update()¶ After drawing, this method should to be called to refresh the screen. When drawing in a
draw()orloop()function, this is called automatically, but when drawing in a tight loop, e.g. during a calculation, it can called manually.Example: An app without a run loop - callingscreen.update()manually¶import tingbot from tingbot import * screen.fill(color='black') # pump the main run loop just once to make sure the app starts tingbot.input.EventHandler().poll() frame_count = 0 while True: screen.fill(color='black') screen.text(frame_count) screen.update() frame_count += 1
-
screen.brightness¶ The brightness of the screen, between 0 and 100.
Example: Dimming the screen¶screen.brightness = 25
Example: Brightness test app¶import tingbot from tingbot import * state = {'brightness': 0} def loop(): screen.brightness = state['brightness'] screen.fill(color='black') screen.text('Brightness\n %i' % state['brightness']) state['brightness'] += 1 if state['brightness'] > 100: state['brightness'] = 0 tingbot.run(loop)
The align option
When used without the xy parameter, the item is positioned relative to the screen/drawing surface.
| Setting | Screenshot | Code |
|---|---|---|
| topleft | 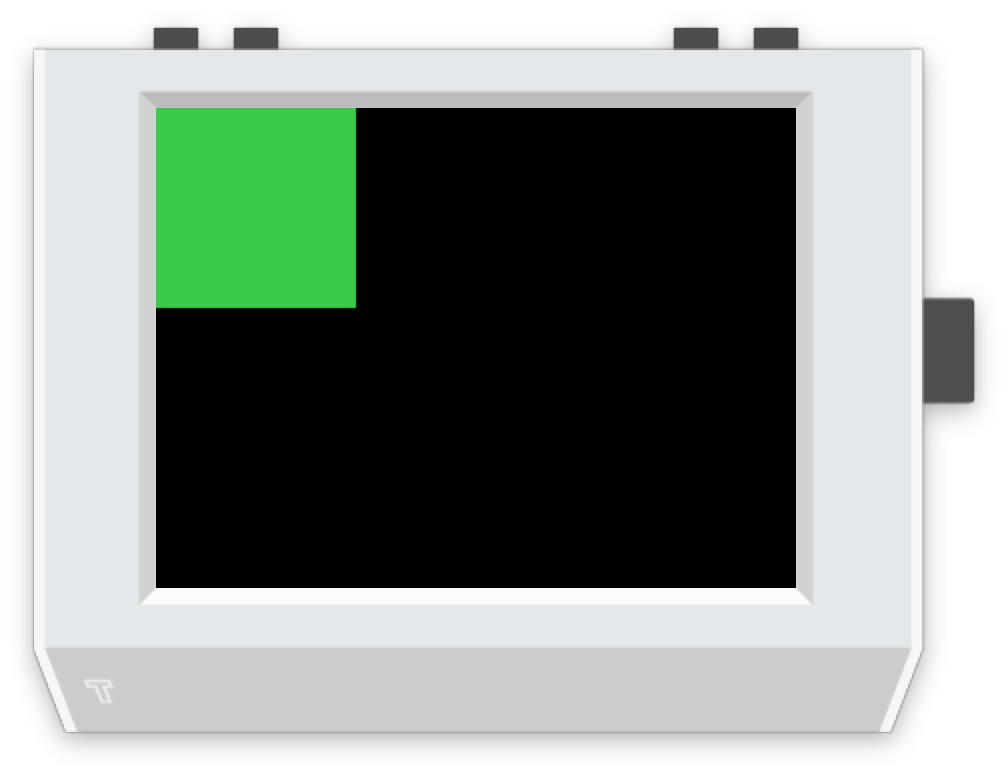
|
screen.rectangle(color='green', align='topleft') |
| top | 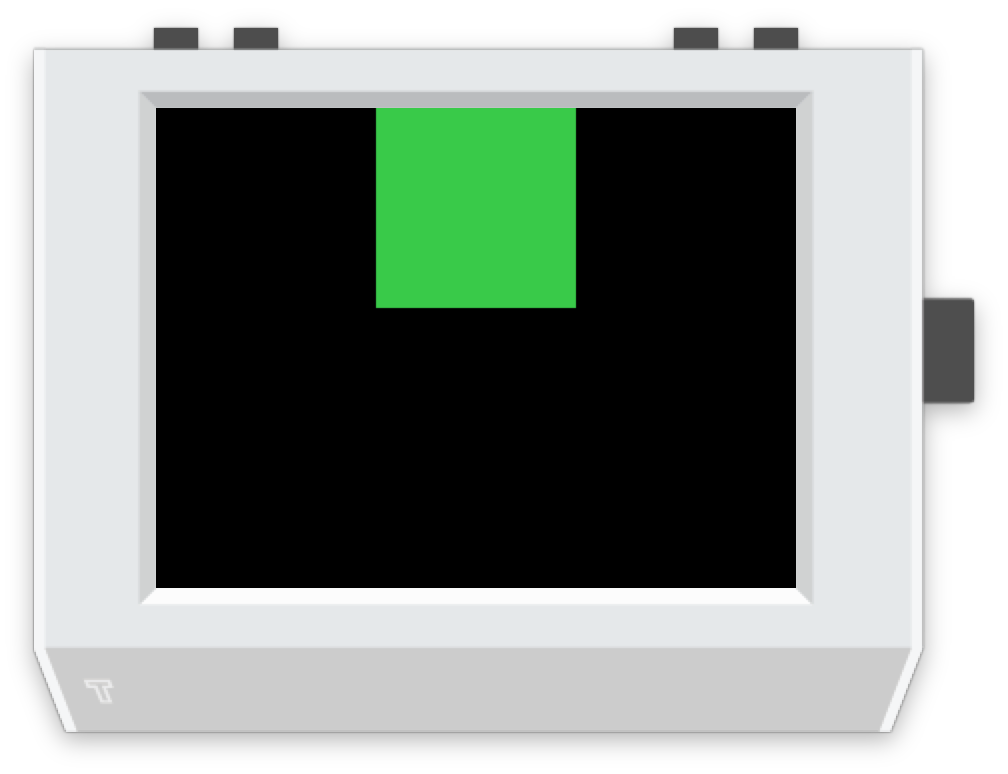
|
screen.rectangle(color='green', align='top') |
| topright | 
|
screen.rectangle(color='green', align='topright') |
| left | 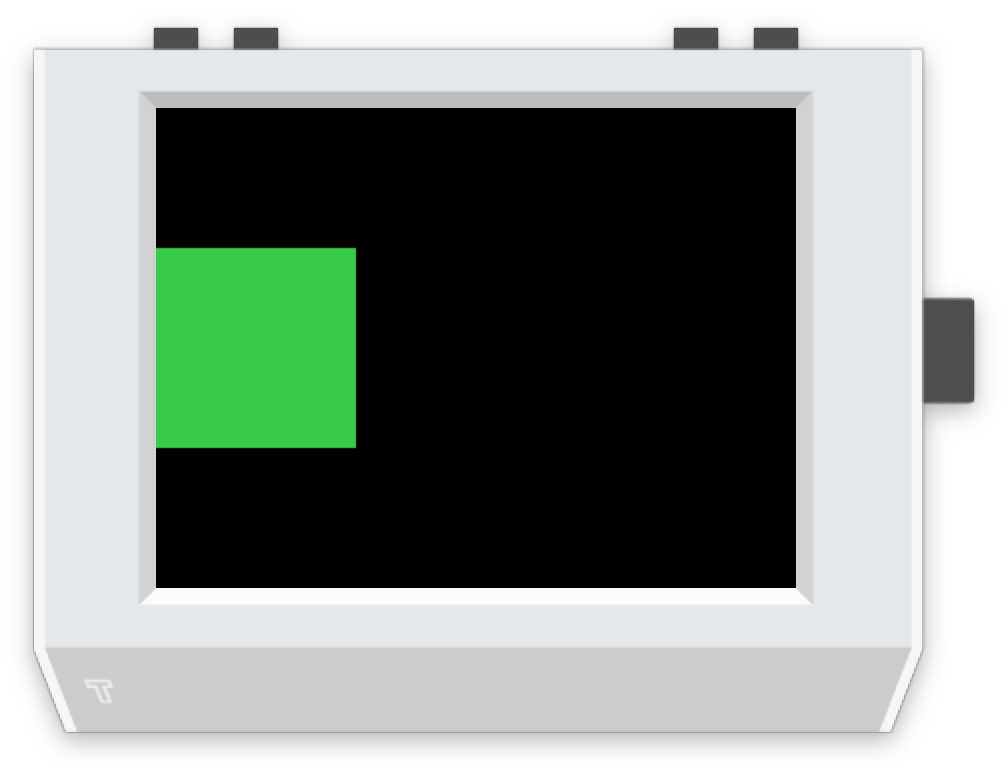
|
screen.rectangle(color='green', align='left') |
| center | 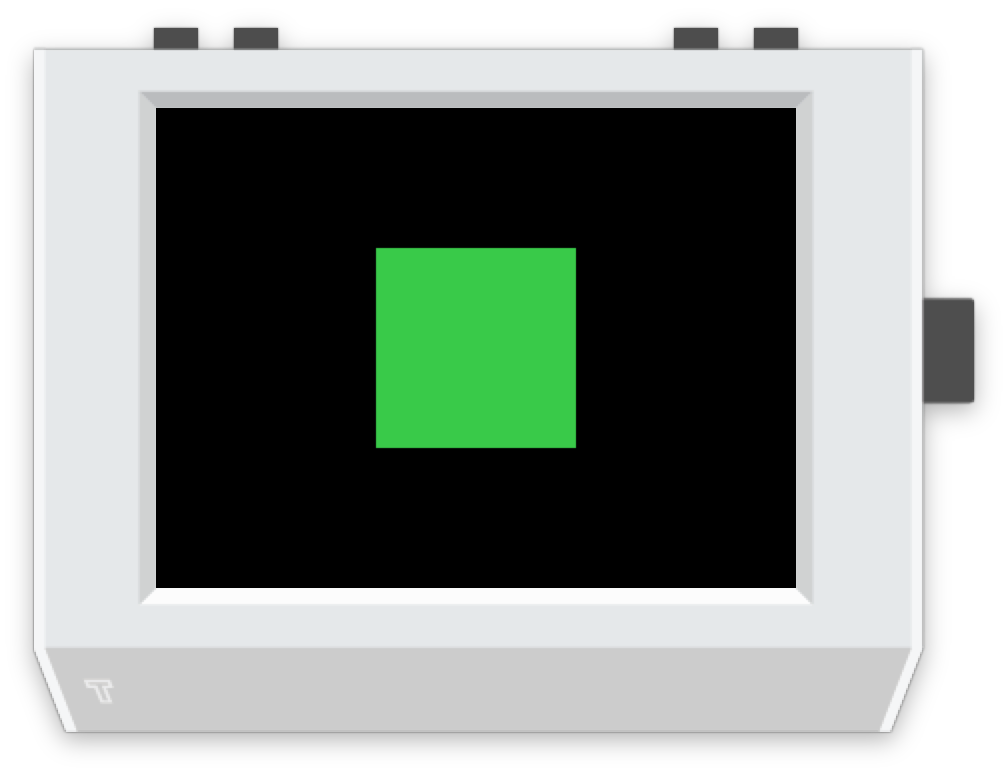
|
screen.rectangle(color='green', align='center') |
| right | 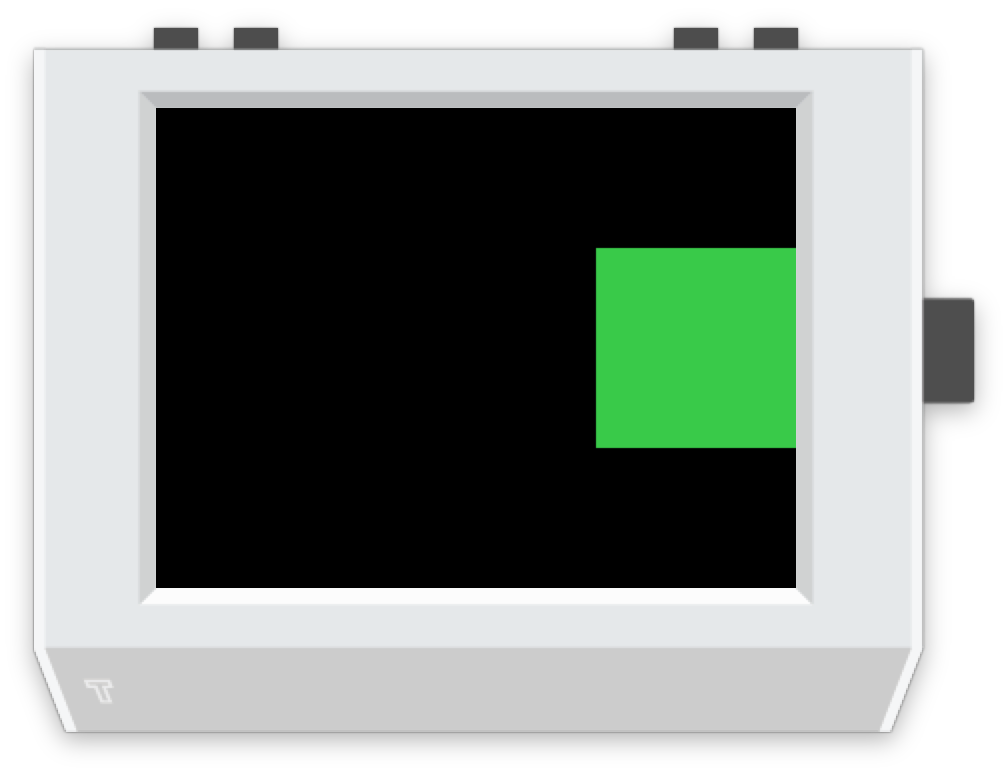
|
screen.rectangle(color='green', align='right') |
| bottomleft | 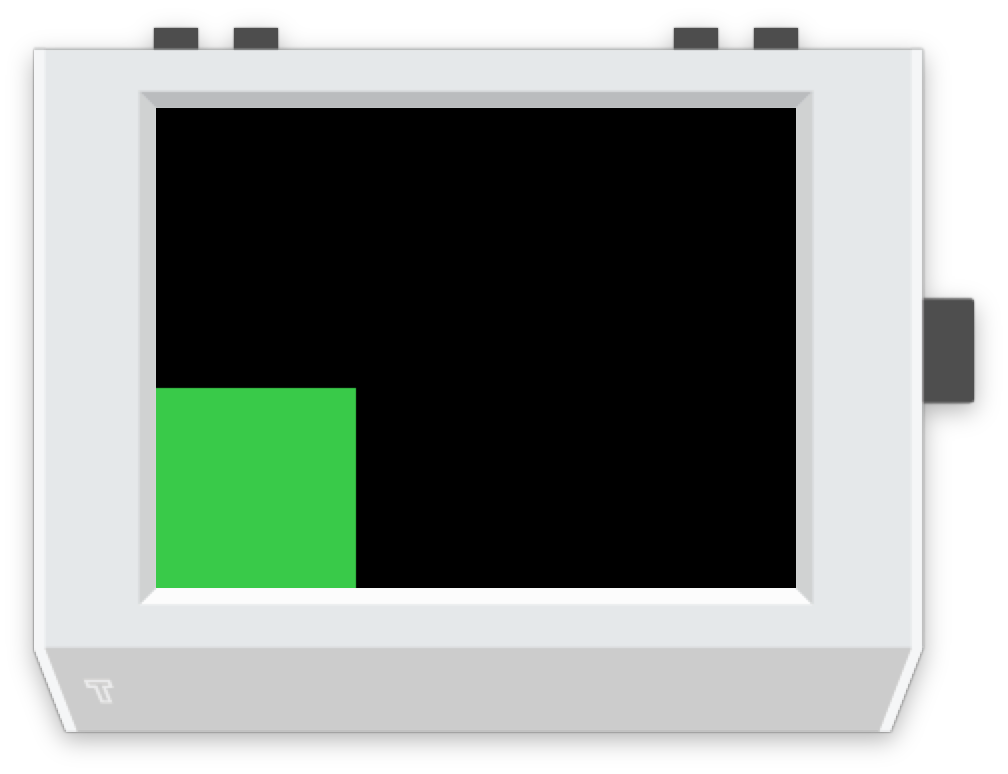
|
screen.rectangle(color='green', align='bottomleft') |
| bottom | 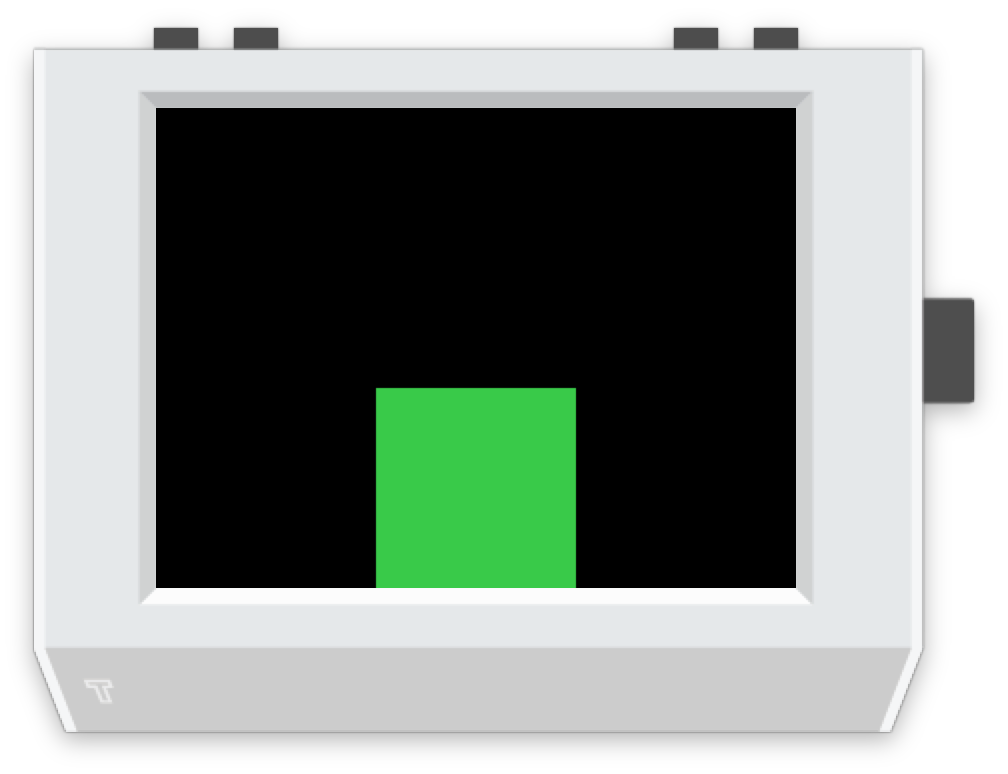
|
screen.rectangle(color='green', align='bottom') |
| bottomright | 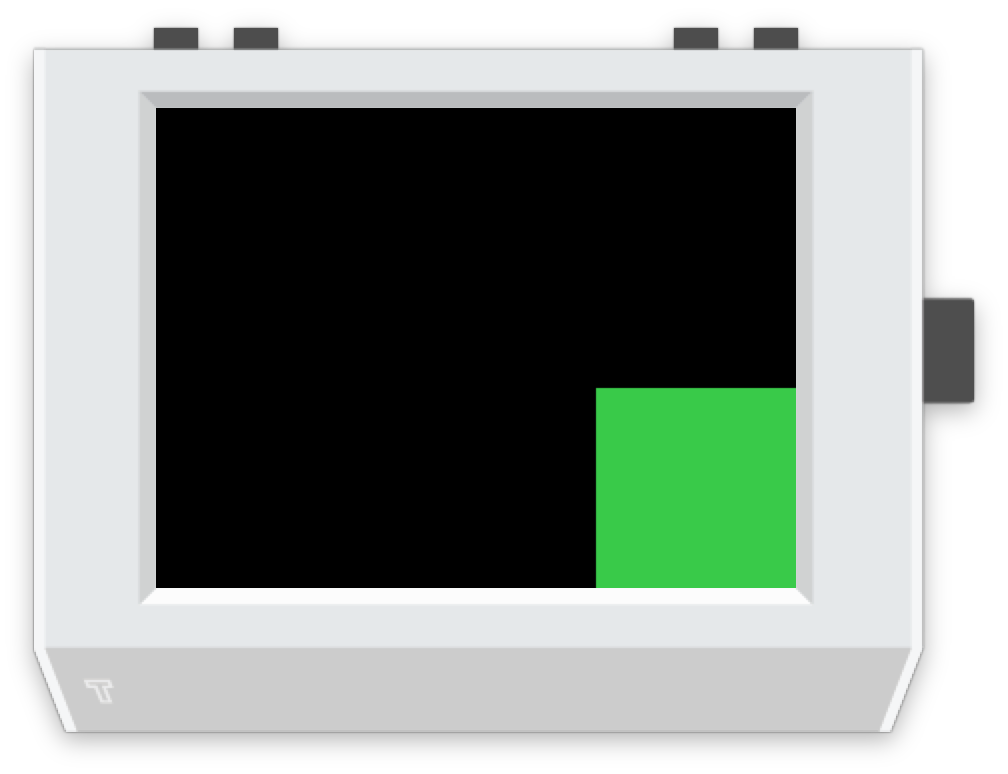
|
screen.rectangle(color='green', align='bottomright') |
When used with the xy parameter, it positions the item relative to the xy point.
| Setting | Screenshot | Code |
|---|---|---|
| topleft | 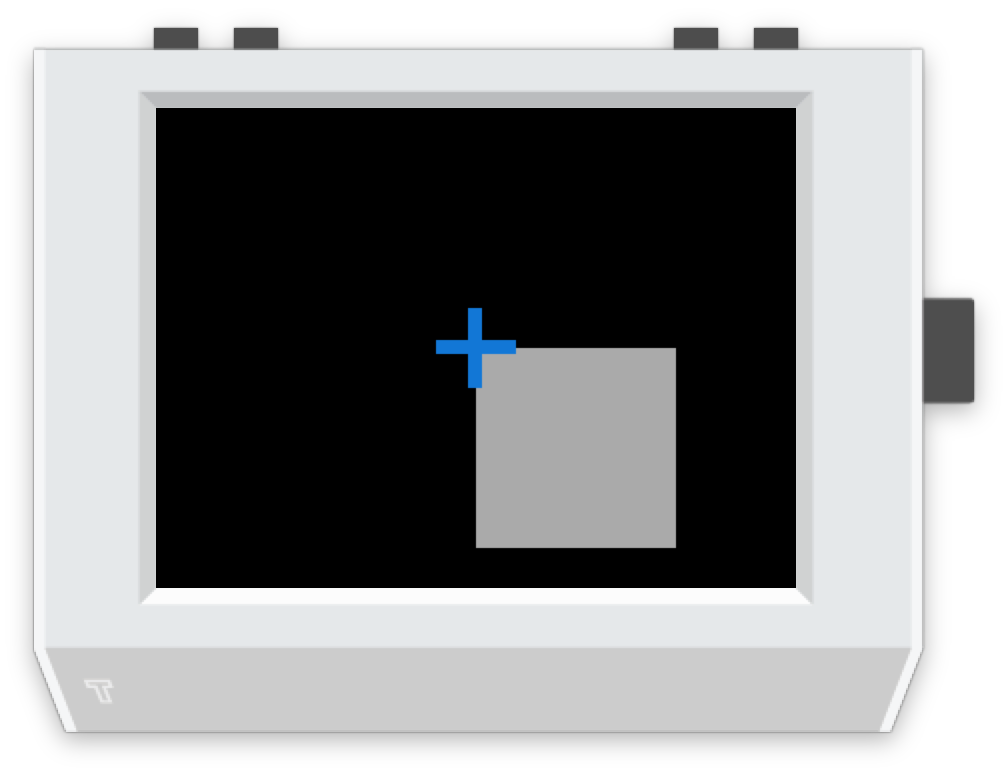
|
screen.rectangle(xy=(160, 120), align='topleft') |
| top | 
|
screen.rectangle(xy=(160, 120), align='top') |
| topright | 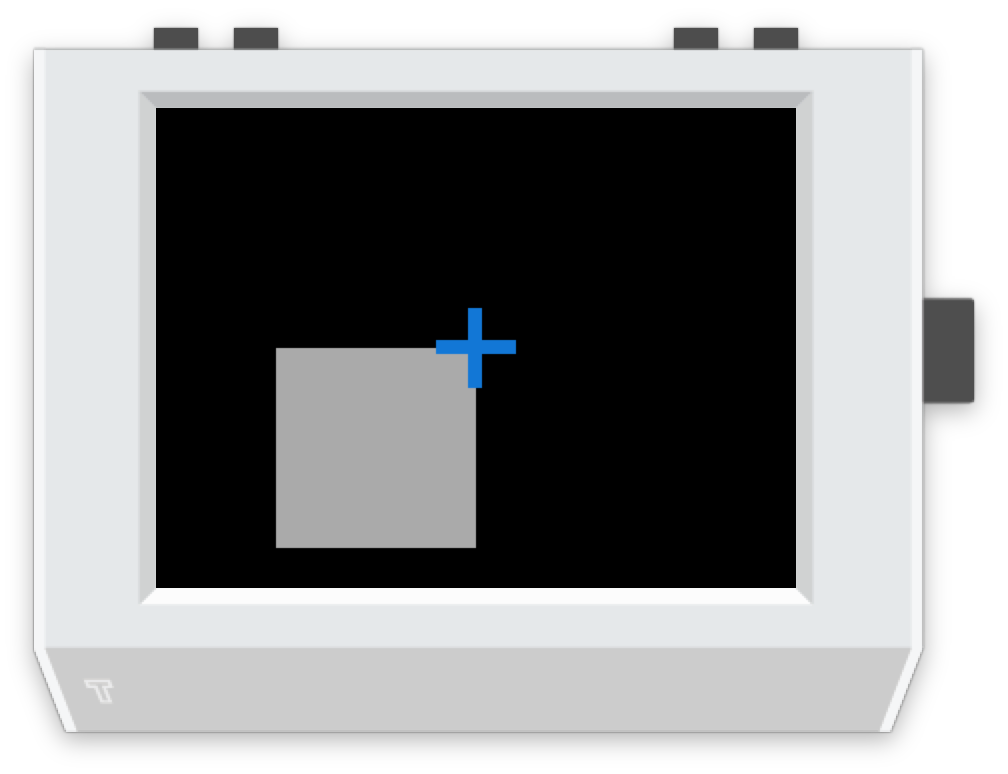
|
screen.rectangle(xy=(160, 120), align='topright') |
| left | 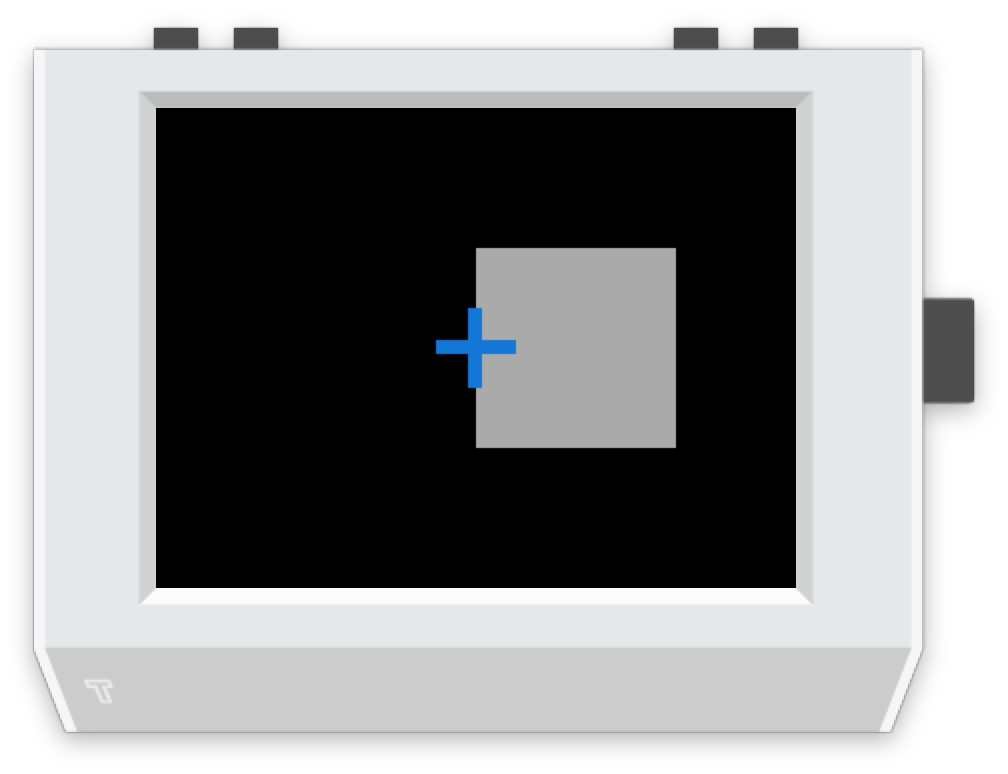
|
screen.rectangle(xy=(160, 120), align='left') |
| center | 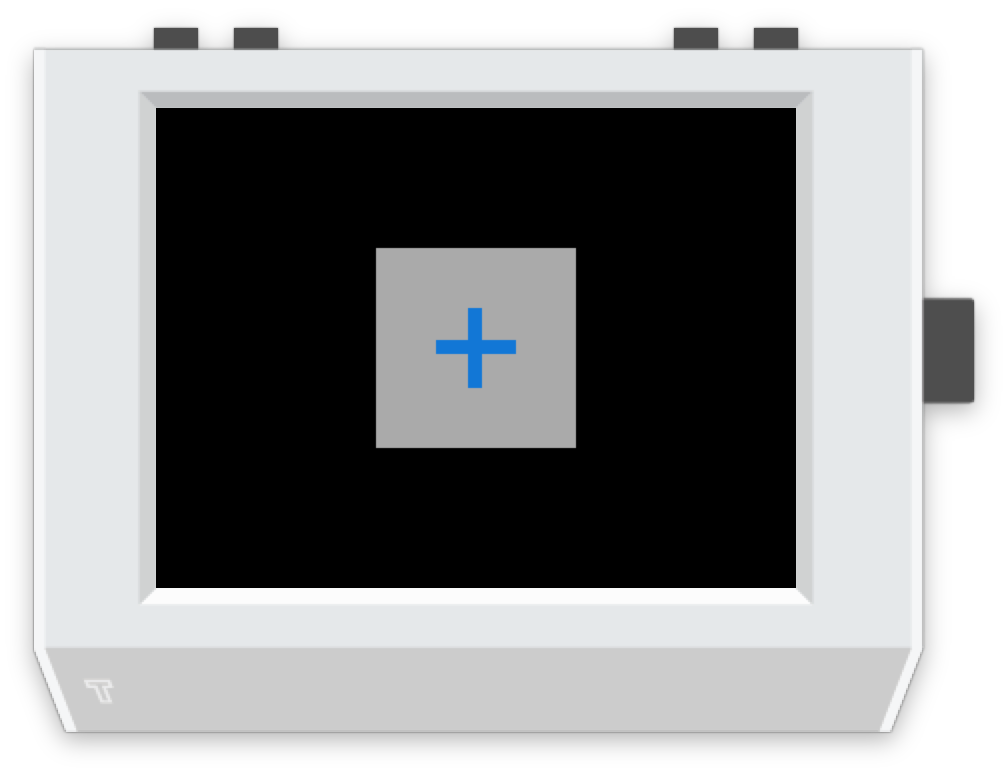
|
screen.rectangle(xy=(160, 120), align='center') |
| right | 
|
screen.rectangle(xy=(160, 120), align='right') |
| bottomleft | 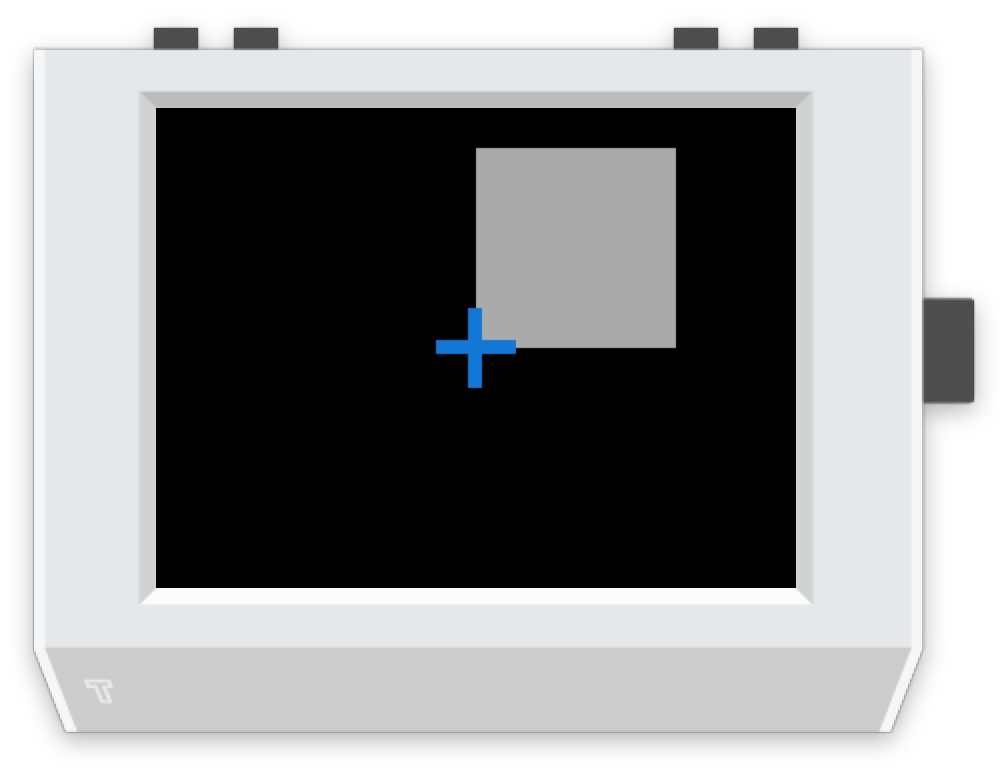
|
screen.rectangle(xy=(160, 120), align='bottomleft') |
| bottom | 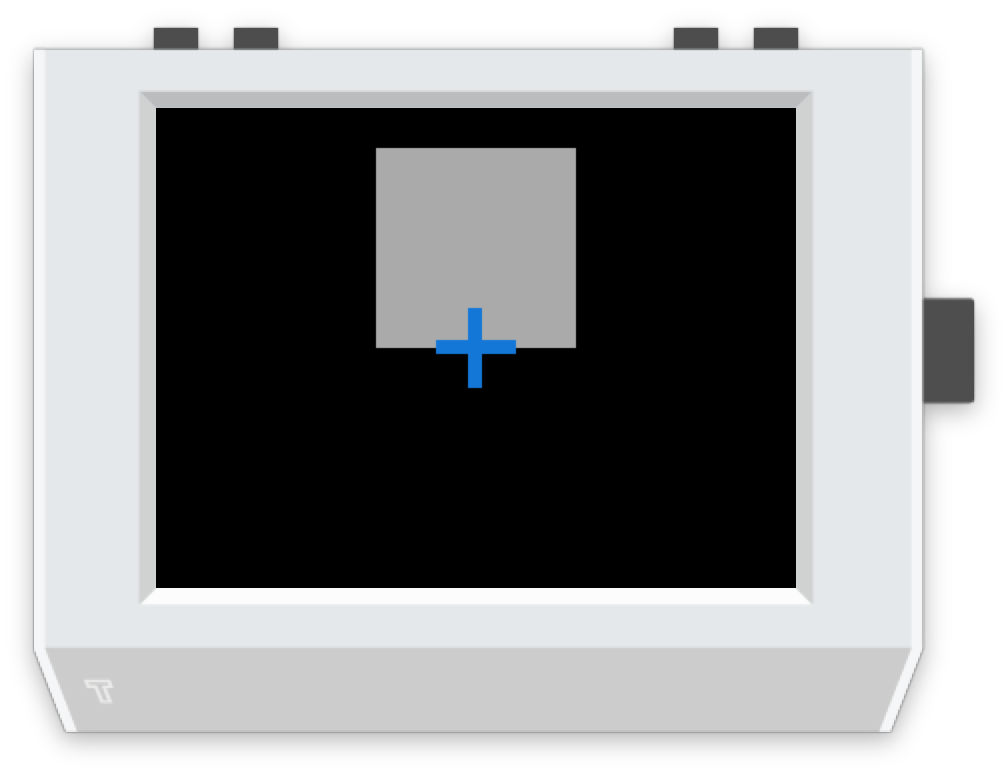
|
screen.rectangle(xy=(160, 120), align='bottom') |
| bottomright | 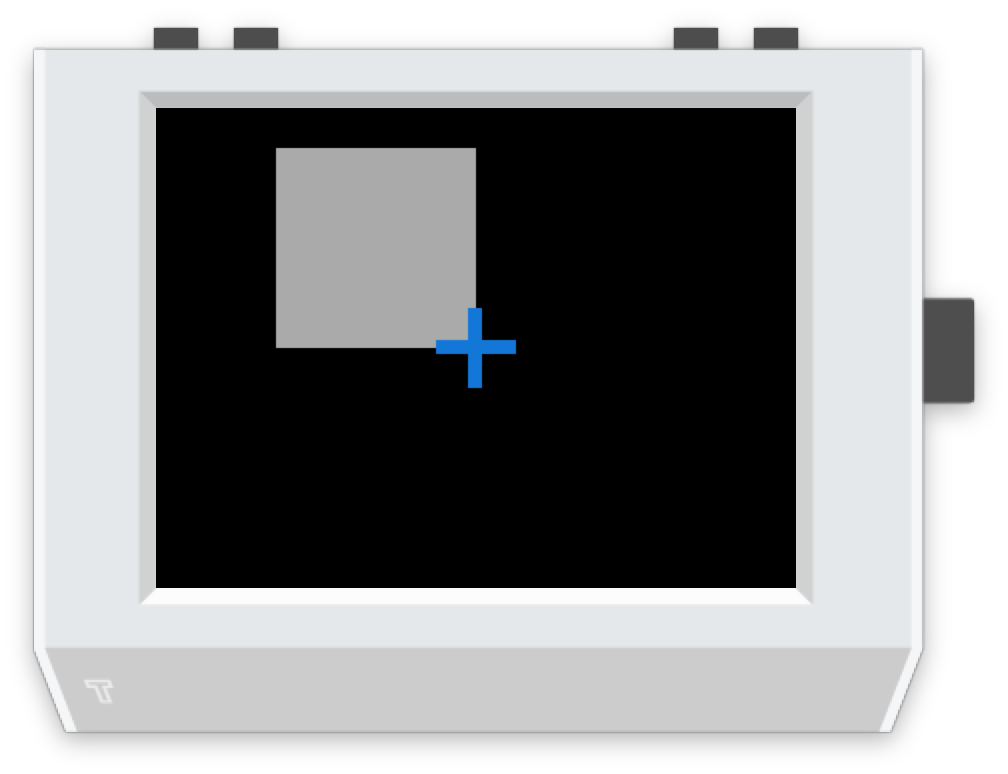
|
screen.rectangle(xy=(160, 120), align='bottomright') |
The color option
The color option can be either an RGB value, or predefined color name.
RGB values
RGB values (as a tuple), like (255, 128, 0).
Predefined colors
We also have a set of default colors, referred to by their name, as a string.
(0, 116, 217)
(0, 116, 217)
(127, 219, 255)
(57, 204, 204)
(61, 153, 112)
(46, 204, 64)
(1, 255, 112)
(255, 220, 0)
(255, 133, 27)
(255, 65, 54)
(133, 20, 75)
(240, 18, 190)
(177, 13, 201)
(0, 0, 0)
(170, 170, 170)
(221, 221, 221)
(255, 255, 255)
Thanks to http://clrs.cc for the color scheme!